


If you’ve just opened your Arduino Uno board, you may be wondering where to start. Arduino is an open-source electronics platform based around a simple board that reads inputs and turns them into outputs.
It’s an incredibly simple system to set up and use. You just need to send instructions to the microcontroller on the board with a few lines of code to tell your Arduino board what to do. Let’s find out how to setup the board and complete a really easy example.
What You’ll Need
● Arduino UNO R3 board
● A USB A-to-B cable
● A personal computer
A Quick Note on Kits
Arduino boards are often bundled into starter kits. We have two: the Arduino Uno Ultimate Starter Kit + LCD Module, and the Arduino Uno 3 Ultimate Starter , which includes a 12-circuit learning guide. You must make sure you buy an Arduino with a USB A-to-B cable (both our kits include this cable) – it’s a necessity to program your device.
Step One: Plug the USB cable in
Plug your USB cable into the Arduino board and into your computer. You will notice that the LED on the board starts to blink. This is just the default program stored on the chip and we will override this later on.
The USB cable powers the board, or you can plug in a power supply to the port at the bottom left of the board. It’s easier to use the USB port to power and program your Arduino device at the same time for now – but you can use the separate power supply when you’re not programming your board in the future.
Step Two: Download and install the Arduino software
You need to download an Arduino Software package to start programming your board. Which package you use depends on the operating system already on your personal computer. The Arduino Software IDE is cross-platform and runs on Windows, Linux and Mac OSX – and is available on the Arduino download page.
Once you have downloaded the software, open the Arduino application on your computer. A window will appear where you type the code you want to compile and send to your board.
Step three: Understanding the code
First, you need to select the type of Arduino you want to program from the drop-down list. In this case, it’s the Arduino Uno.
Next, you need to write a few lines of code. The code segments you write for your Arduino are called sketches, and they are written in the C++ programming language.
Every sketch needs two “void” functions – these functions do not return any value. The first void function is setup () and this runs once, just after your Arduino is powered up. The second void function is a loop () and this runs continuously after the initial setup.
All your initialization steps need to run in the setup () function and the loop () is where you write the code you want to run repeatedly after setup.
A basic sketch looks like this:
void setup()
{
}
void loop()
{
}
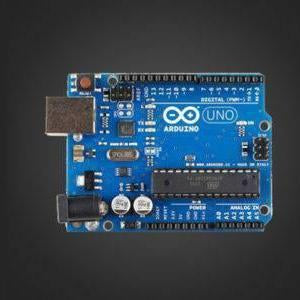
Step four: Understanding the hardware
Take another look at your board. On the top edge, you’ll see two black rectangles with several squares in it. These black rectangles are called headers. This is where you can connect components to your Arduino board. Pins are the spaces where these components connect directly to your board.
You need to know what component each pin is connected to in order to successfully program your Arduino. It’s easy to do – the pin numbers can be seen next to the headers on the board in white.
Step five: A quick example
As mentioned, there’s an LED on your board – and we’re going to program this now. This onboard LED is on pin number 13.
Enter the following code to
1. Create a variable called ledPin with an integer (int) type.
2. Call a special function called pinMode() in the setup to assign the LED as an output.
3. Call another special function called digitalWrite() to turn off the LED (and override the default flashing LED).
int ledPin = 13;
void setup()
{
pinMode(ledPin, OUTPUT);
}
void loop()
{
digitalWrite(ledPin, LOW);
}
Compile the code by clicking the “upload” arrow button in the application window. The LED will turn off.
Now, replace the LOW for HIGH in the digitalWrite() function and hit the “upload” arrow button again. The LED will turn on.
What next?
This simple example is just your first step into the world of the Arduino platform. There’s a lot going on in this space – check out our guide covering “How to start making your own electronics with your Arduino” for a little inspiration.