


In the 1986 movie Labyrinth starring David Bowie as the Goblin King, the power of voodoo is helpful to solve the complicated maze. But now you can use the power of Arduino and make your very own labyrinth with super simple and fun automated controls
In this project inspired by Ahmed Azouz, you get to develop a 21st century version of a classic labyrinth game. The traditional labyrinth is a game that challenges your physical skills and hand-eye coordination as you try to tilt a box with a maze and a marble, trying to weave the marble through the maze and get it to the end without letting it fall into a number of holes along the misguided paths.
In this version, you’ll make a maze out of cardboard, and by following Ahmed Azouz’s lead, you can get this done in just one hour. Then you’ll connect your labyrinth to Arduino for a high-version of the classic game.
Here are the parts, tools, and services you’ll need:
- Arduino UNO & Genuino UNO
- Arduino IDE
- Jumper Wires
- Breadboard
- SG90 Microservo Motor
- Joystick Module
- Hot Glue Glun
- Sharp Knife
- Cardboard
- Screws and Nuts (12mm x 3mm)
- Ruler
- Pencil
- Marble
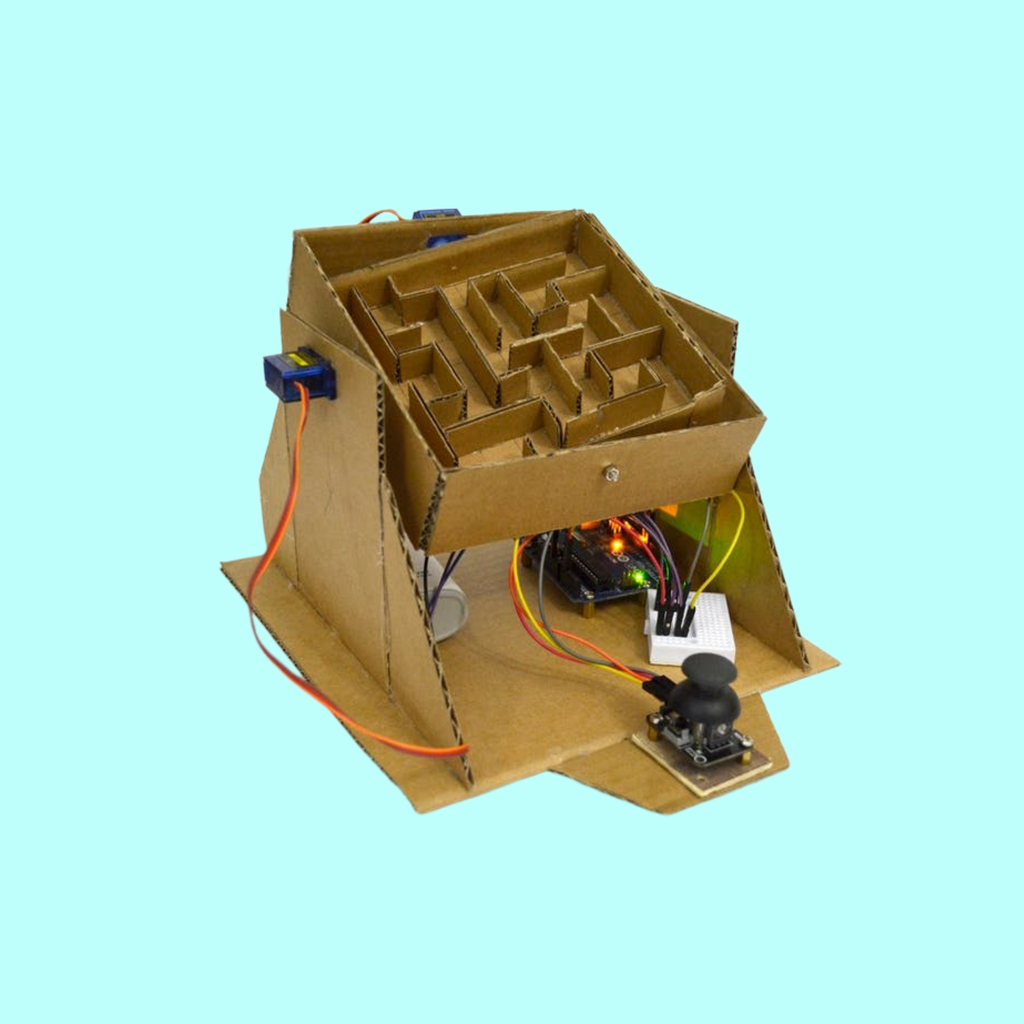
1. Design Your Labyrinth and Cut it Out of Cardboard
Your first task is to create your cardboard labyrinth. We recommend following Ahmed Azouz’s detailed instruction here.
Essentially, you’ll be cutting out various shapes of cardboard. Then you’ll be drilling some holes for the motor shaft. Ahmed Azouz provide several different maze configurations, so you’ll have options as to which version you like best – or after looking at these guides, you may want to design your own!
One you know your maze design and have cut out all the necessary cardboard pieces, you’ll use the hot glue gun to assemble it all and also secure the motor in place.
2. Hook Up the Wires
Once your cardboard maze is ready, it’s time to set up your wiring. You can follow the schematics laid out here.
Here’s the set-up:
- Arduino Pin 8 X Servo 1 – X Axis (yellow wire)
- Arduino Pin 9 X Servo 1 – Y Axis (yellow wire)
- Arduino Pin A0 X Joystick Pin VRX
- Arduino Pin A1 X Joystick Pin VRY
- Arduino 5V and GND X Breadboard
- Joystick VCC and GND X Breadboard
- Red & Brown Wires X Breadboard
3. Code
Next, you’ll want to upload the code which you can find here.
First, you’ll want to connect your Arduino board to your PC via the USB cable. Once you open Arduino IDE, you’ll copy and paste the above code into a New Sketch.
(Confirm the name of the serial port by going to the “Tools menu” then “Board” the “Choose Active Serial Port”)
You should now get the message that you’re set up and ready to go!
That’s it! You should now be ready to enjoy your very own labyrinth. For more tips and additional help with this project, be sure to check out this tutorial.
The team here at Vilros hopes you’ll have hours of fun (and no nasty goblins) playing with your very own labyrinth. For more project ideas with Arduino or Raspberry Pi, be sure to come back to the Vilros Projects blog and find another new project adventure!