


Remember Wallace and Gromit?
Before the days of sophisticated digital animation, they were just mounds of clay brought to life by the magic (and hard work!) of photographing a scene at the rate of about 24 shots for every second of the movie.
Luckily, in this day and age, anyone can make a stop action movie through a much easier process. In this project inspired by Christian Cawley, you can use Raspberry Pi and the PiCam module to create your very own stop motion Claymation animation studio.
Parts & Accessories
Here are the parts you’ll need:
- Raspberry Pi (we recommend the latest Raspberry Pi 4 with 4GB for the best performance)
- PiCam Module
- Clay to create your animatable figurines (Check out this video on how to create your own clay characters)
- A Button to take photos (requiring a Breadboard, 2 Male-to-Female Wires, plus a Dual-State Push Button)
You may also want some additional accessories to complete your filming set up, such as:
- A Stand for the PiCam, with possibly a Grip and/or a Tripod
- Your Smartphone with a Dashboard Mount
- A Raspberry Pi Case to mount the camera
Set Up Your Raspberry Pi to Function as a Camera
If it’s not already, make sure your PiCam is connected to your Raspberry Pi.
Then, plug-in and boot-up your Raspberry Pi like normal using the Raspbian operating system.
To test the camera configuration, boot into the GUI and enter:
raspistill -o image1.jpg
This will snap a photo of whatever is in front of the camera. (You can find the image in File Manager under the Home directory).
Now you know your camera function is set-up is good to go!
Adding Stop Motion
In order to introduce the stop motion capability and start animating the images of your clay figurines, you’ll need some Python code.
Start a new Python project and enter:
import picamera
from RPi import GPIO
button = 17
GPIO.setmode(GPIO.BCM)
GPIO.setup(button, GPIO.IN, GPIO.PUD_UP)
with picamera.PiCamera() as camera:
camera.start_preview()
frame = 1
while True:
GPIO.wait_for_edge(button, GPIO.FALLING)
camera.capture('/home/pi/animation/frame%03d.jpg' % frame)
frame += 1
camera.stop_preview()
Make sure to save this as something you’ll recognize, for example: animate.py
Adding the Button
Now let’s get your button set up.
As images are taken, they automatically saved into a folder on your Raspberry Pi. You can speed up and further automate the process by setting up and connecting a button to the GPIO array to capture each image in sequence.
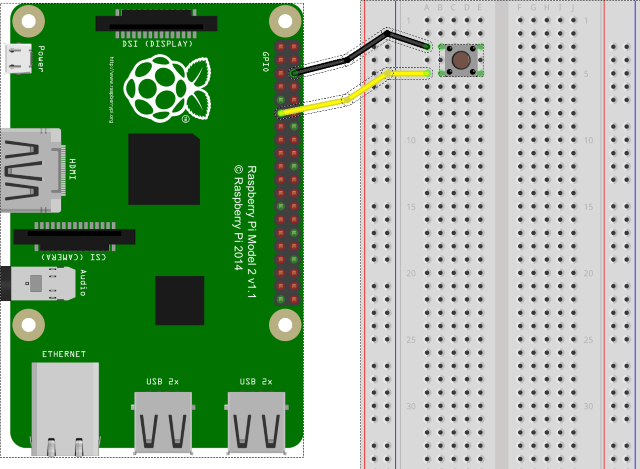
Connect your dual-state push button to your breadboard as shown in this image (the two wires will connect to the 6 & 11 pins on the GPIO).
Now you’ll be able to press the button in order to take each shot with your Raspberry Pi camera.
However, instead of running in Python, open a new Terminal window and use
sudo python3 animation.py
You should now be able to capture and save your sequence of images with each push or the button. When you’re done, just press CTRL+C to stop the script.
From a Bunch of Images to a Film
Now you should be ready to start capturing individual shots. However, to stitch them all together into one coherent film, you’ll need to use ffmpeg, which you can install by entering
sudo apt-get install ffmpeg
Use this script, making sure the file path is correct for your project:
ffmpeg -y -f image2 -i /home/pi/Desktop/stop-motion/frame%03d.jpg -r 24 -vcodec libx264 -profile high -preset slow /home/pi/Desktop/stop-motion/animation.mp4
Movie Time!
Now you can watch your new Claymation animated film using the OMX Player:
omxplayer animation.mp4
How did it turn out? If you try this project, we’d love for you to share your animation with all of us here at Vilros.
And come back to check out more fun projects for Raspberry Pi, Arduino, and more on our Vilros Projects blog.